Custom Furniture
Award-winning Designs Made in Texas
Showroom - Open by Appointment
Custom Furniture made in Texas

Custom
Woods and hardwoods sourced from all over the world are used to build one-of-a-kind or limited production items.
Heirloom
Whether you're remodeling, building new construction, redecorating or commissioning a gift for a special person.
Award Winning
Leo has won numerous awards nationwide for his high quality design, construction and execution.
Heirloom Quality
Heirloom quality custom furniture and interior millwork, whether traditional or modern can be found at the Austin, Texas woodworking studio of Leo Litto. Woods and hardwoods sourced from all over the world are used to build one-of-a-kind or limited production items as well as historically accurate antique reproductions.
Here you can order a wooden dining or side table, chair, desk, bar stool, dresser, bureau, bed or bedroom set, side board, buffet, bench, settee, sewing table, tray, cutting board, kitchen table or counter tops specifically made for you. A bench or dining set with chairs in the style of George Nakashima, or a rocking chair patterned after those of Sam Maloof.
Or perhaps you would like a unique new vanity, library, bar, wine cellar, office, cabinet, master suite, bath, theater, or other special room built from genuine Texas hardwood such as pecan, walnut, cherry, and mesquite.
Imaginative Solutions
Leo specializes in creating imaginative solutions based upon historical styles like Duncan Phyfe, Chippendale, and Hepplewhite; or clean contemporary designs like Danish modern, live edge slab, mid-century modern, or something entirely different.
Whether you're remodeling, building new construction, redecorating or commissioning a gift for a special person, working with designer craftsman Litto is a true collaborative adventure.
Beginning with design concepts derived from initial consultation, work progresses through ideation to computer generated 3D CAD models and shop drawings. Wood stock is carefully selected for color and grain before commencing layout and blanking of individual components.
Award Winning
Hailing from multiple generations of luthiers, artists and artisans, the sensibilities of a craftsman are infused into every piece that comes out of this modern studio. Yet by blending the use of precision, high quality European woodworking machinery with traditional techniques such as mortise and tenon joints and hand cut dovetail joinery, Litto is able to reduce the time attributable to routine tasks that are most effectively done by machine.
Leo has won numerous awards nationwide for his high quality design, construction, execution and flawless, state-of-the-art finishes which protect and enhance the beauty of each and every piece.
Your Work Of Art
Working with Leo will be an unforgettable experience as you watch your unique, custom piece of furniture or millwork project move from concept to objective reality. A work of art in which you will participate; one that will move you and give something intangible back to you every time you use it.
Whether your tastes are more traditional or eclectic, conservative or contemporary, from ash to zebra wood, avodire to ziricote, Leo will develop a piece that is just right for you.
Why not start your personal adventure by calling, texting, or emailing today?

Furniture jewelry, in Swiss pear wood.

These miniature ball catches from #hortonbrasses are absolutely phenomenal in their precision and crisp function, but they are one-shots. By that I mean once you drill the holes and install the plunger and the receiver, that's it - you're pretty much stuck with the results. The parts can't be removed, and if the door rattles or sits proud of the opening, there's no way to adjust the position of the parts. I've devised this "experimental" door to solve the problem, with a removable portion that I can drill at the drill press which is fixtured with an angle plate clamped to the table. Very slight adjustments allow me to get the fit just the way I want it before making that fateful hole in the door stile.

Started my day by cutting an absolutely horrid mortise in this desk carcase. Fortunately, my dad taught me that the mark of a true craftsman is one who can fix anything he hashes up - and fix it so that the judges can't even find the repair. And, I would add, the repair must not impair the strength nor function of the workpiece.

A vitrine by art deco master Carlo Bugatti, at the Kirkland decorative arts museum in Denver. Wow. The 20th century furniture collecting here is amazing.

Back to building doll house furniture again. Love working this gorgeous pattern mahogany but the radius corners are a real chore.

First coat of grain fill and POP!! I finally get to see what this top will really look like.

As far down as I dare go with the Timesaver. .740" thick using a 220 grit paper backed belt, contact roll only, no platen. Cuban mahogany veneered top with a beeswing figure satinwood accent band and solid mahogany edge. Now on to the critical hand sanding and edge profiling before a grain fill.

Dialing in the finished thickness on these bent lamination leaves with the big green Timesaver. Woulda just used the planer except for the crazy grain from this 12/4 "pattern mahogany" sold to me as such by a major importer who shall remain nameless here. Apparently grading standards have changed...

For years I have eschewed a stabilizing base for my routers, but decided to make one for a particularly important spline groove on a tabletop edge. What a difference it makes, especially at the ends of the cut where effectively less than a quarter of the round router base would bear on the workpiece. The second photo shows it really well, no curved witness marks where ordinarily the cuts wouldn't be quite on the same plane. Well worth the hour or so spent fabricating the 3/8" acrylic piece and maple ķnob.

A concentric counter bore on a surface with a very steep angle. CMT 3/8" plug cutter over a 3/8" high speed steel drill bit. Sometimes I'd rather be lucky than good...

A long overdue improvement to the old #multirouter today. A Chinese whizz-bang DRO on the X-axis, 40 bucks from Amazon. More than a full day's work to design and fab the custom brackets to hold the mechanism and to fabricate a longer operating link for the actuator in order to clear the electronics. This will be well worth the time spent however. Adjustment will be a snap now. Note the old tech long- stroke dial indicator for the Z-axis, which works just fine as I usually don't move this axis much. Perhaps I'll get another cheap DRO for the Z - the upgrade from #woodpeckerstools is almost $500, and the setup is a LOT easier than the X-axis...

It's such a pleasure and privilege to work with these fantastic veneers from #certainlywood. Quartered swietenia macrophylla and curly acer saccharum.

This is the setup I use for half blind dovetails. It's dead-on accurate and they fit right first try, almost every time. If the objective is good long grain to long grain contact for the maximum glued surface area, this technique is hard to beat. Upspiral carbide cutter does the wasting nearly to the knife marks and establishes the back and bottom of the socket. Clamped in place, the angled chisel guide facilitates perfectly perpendicular socket cheeks. Then it's just a little clean up in the corners with knife and chisel.

Jacques Gruber's shop must have built at least a few of these remarkable art nouveau desk and chair sets near the fin de siecle. This one can be found at the McNay museum in Alamo Heights and it looks identical to the photograph in Alistair Duncan's definitive book on art nouveau furniture. That one is presumably in the collection of the museum in Nancy, France where Gruber and company worked. A close inspection however reveals that the unusual mahogany veneers for the tops are very similar and probably came from the same boule, but are laid up differently. The fluid lines, textures, and deep carving on these desks and chairs are magnificent. The joinery, not so much

Glue up can be a stressful, messy operation.
Or, it can be calm, orderly, neat and deliberate. On more complicated assemblies I opt for a slow set epoxy with a relatively low viscosity so I can apply it sparingly using a 10ml syringe with a 14ga needle and a small makeup brush. Wet out both surfaces for best adhesion. Unlike EVA wood glues which get quite grabby, making it difficult to align parts, the epoxy actually lubricates tight joints so they can easily be slid into position. The clamps can't be removed until tomorrow, but this critical assembly of sub- assemblies accounting for many dozens of hours of shop time is perfectly aligned, tightly fitted, and didn't require an ounce of sweat, cursing, or heaven forbid, the dreaded dead blow hammers.

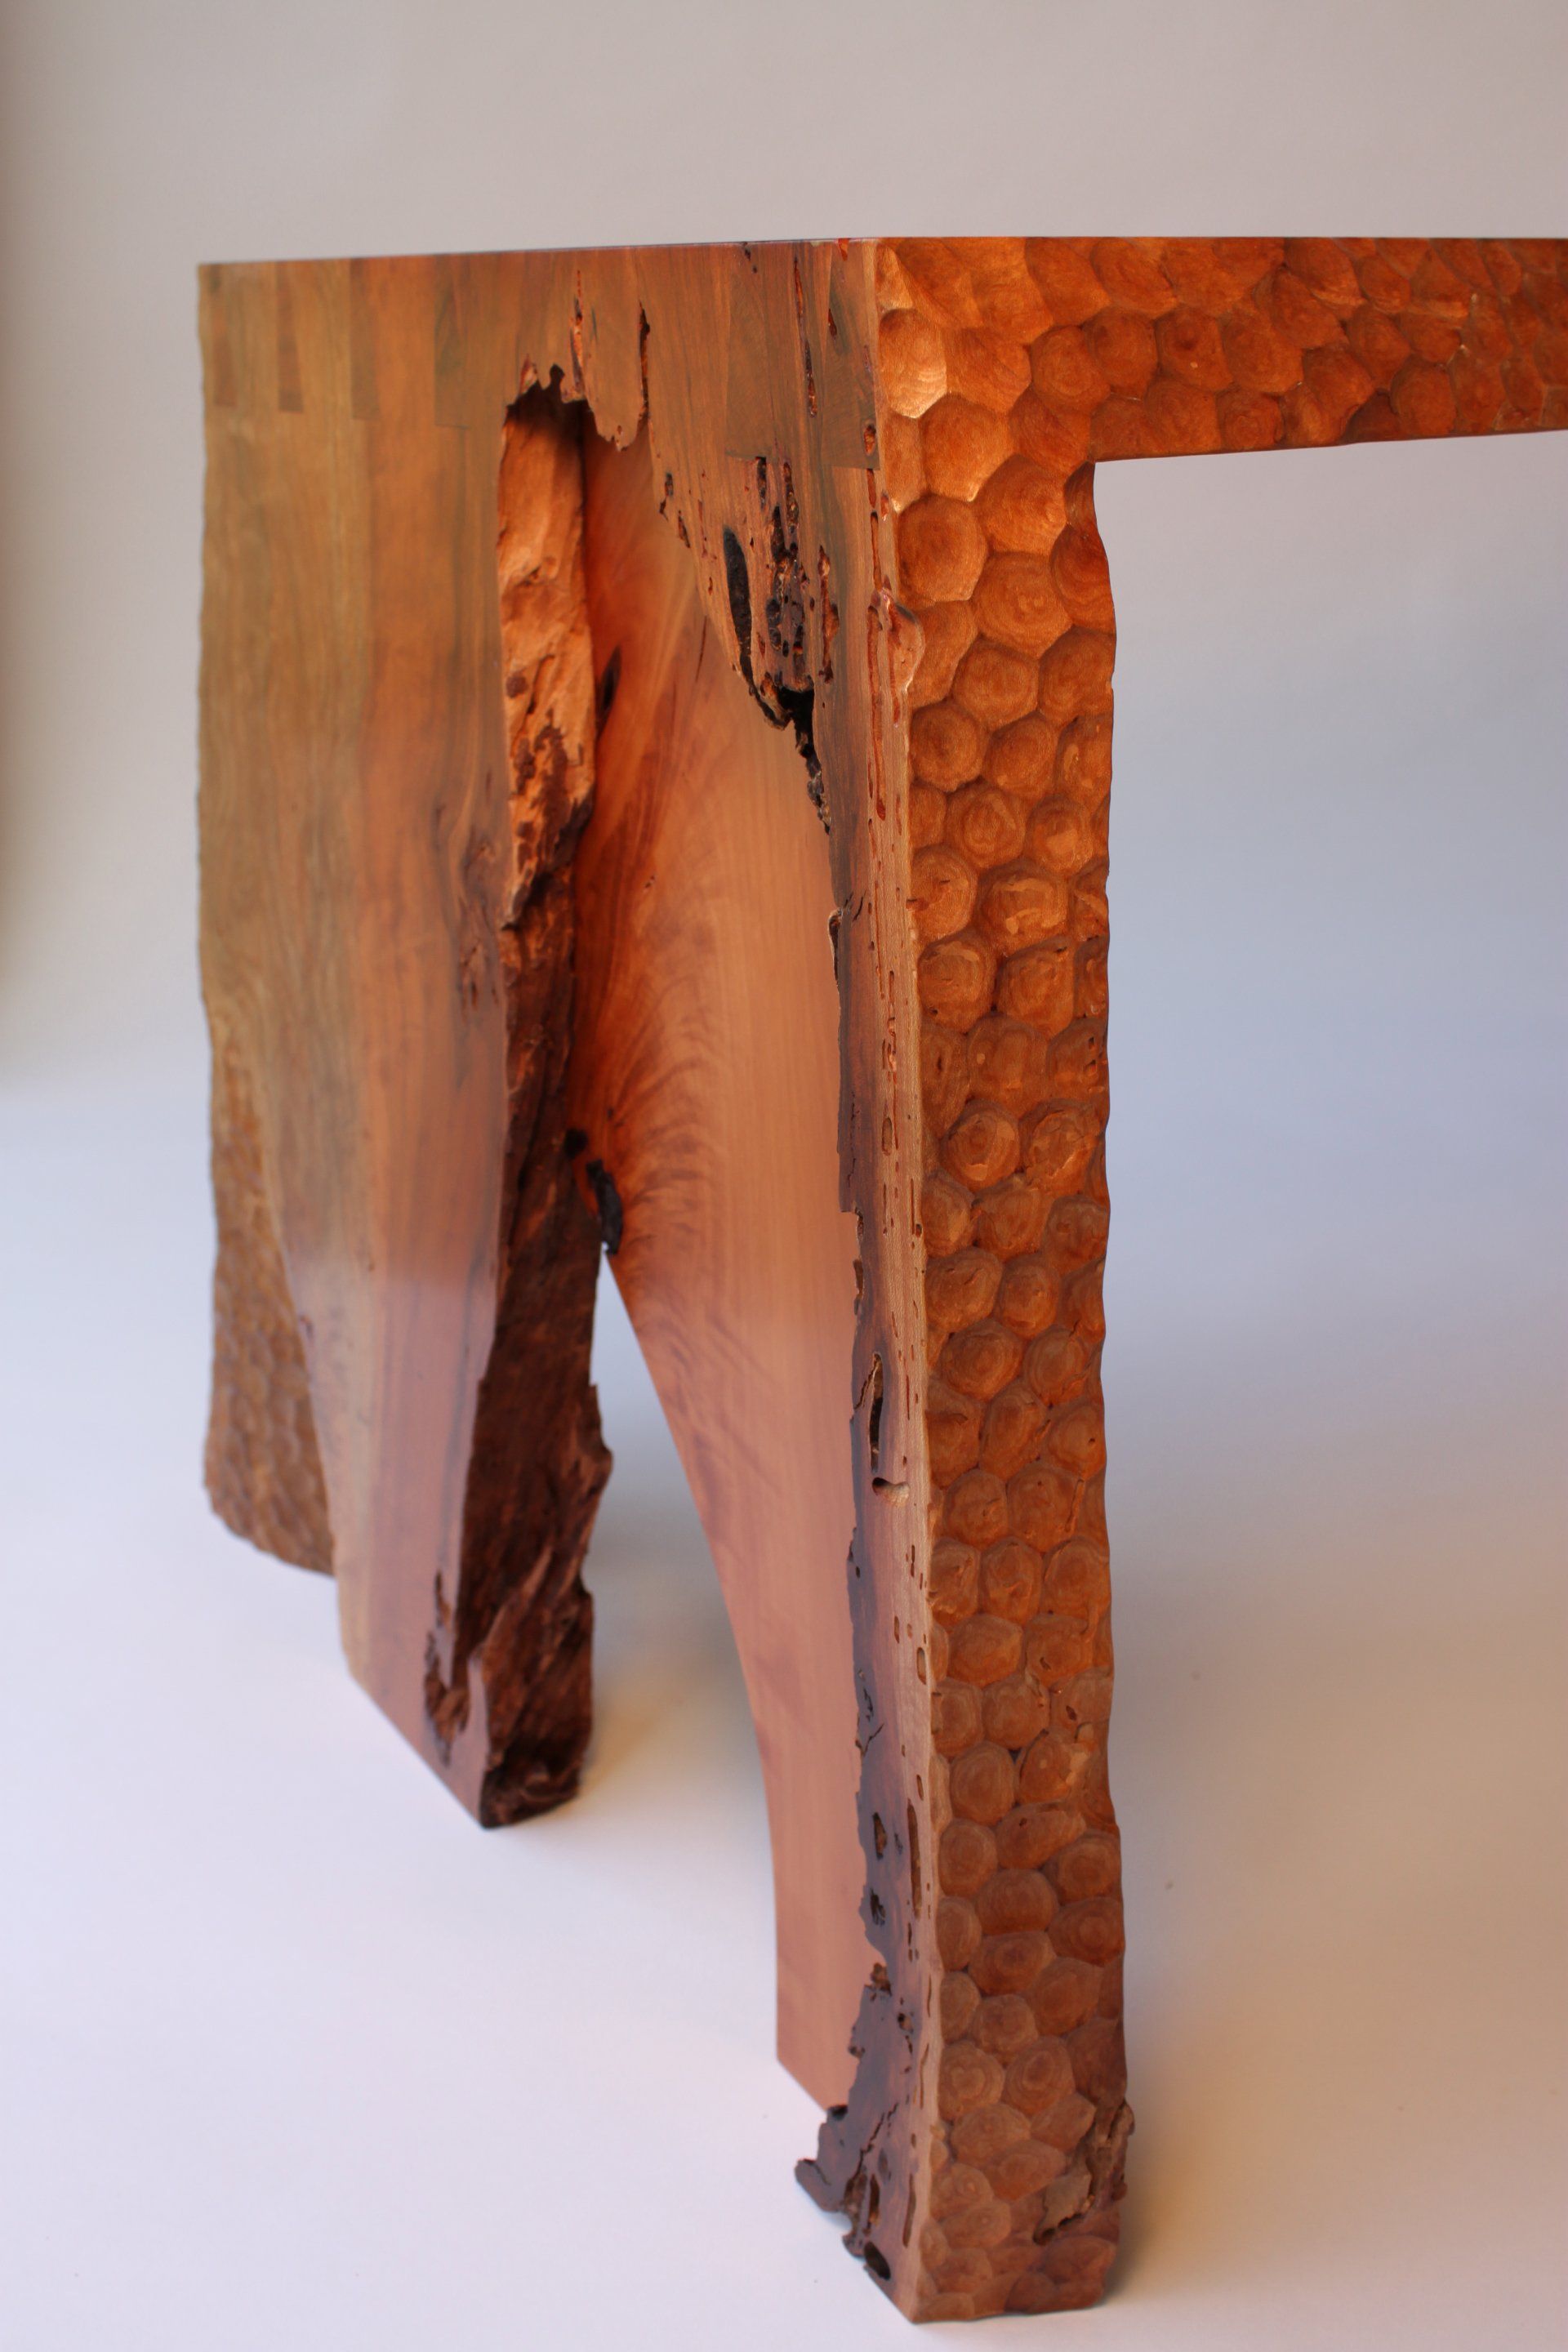
An old door installer's trick to insure planarity of the jambs works equally well here to check that the desk's feet are all on the same plane. Much to my surprise and delight with these squirrelly parabolic arches, they are within one half the diameter of the one millimeter nylon cord, just as they came off the cutting fixture.

Finicky face frame dry fit first, then glued together, clamped in place and removed when dry until final assembly. The tenons are 1/4 thick x 1/2 wide by 5/8 long. I couldn't break the poplar test joint in my bench vice. 3mm plywood splines hold the assembly to the carcase. Super accurate mortises courtesy of JDS multirouter.

Gluing the edges on this gorgeous Cuban mahogany top proved far more difficult than expected. The curved strip, while only 1.5" wide, fought me all the way. It just did not want to remain attached to its curved substrate at the ends. I finally had to use epoxy and long splines that engaged the side strips. I always place alignment marks with blue tape during the dry- fitting phase on this type of assembly. In the heat of glue up accurate placement can be tricky and this eliminates trying frantically to move the piece as the adhesive is starting to really grab.

Man I should been a jeweler, at least they make money, Part II. Fixtures and methods for the retractable drawer stops that will go in Corrin's desk. These will be embedded in the upper stretcher of the carcase. The drawer boxes are quite small, only 6 x 2-5/8 in section, so only a small, unobtrusive stop that won't impinge much on the drawer volume was desired. Now that I've spent an entire day on the fixtures, I'll be able to just whip them out and quickly add this feature to future projects. That is, if I can find them at that time....

Carcase assembly today for Corrin's desk. Daunting work as everything must be perfectly aligned and square for the design to work as intended. It's starting to get exciting though. A finished product is coming from those Fusion 360 drawings!

Yikes - that's a lot of blade and this ain't no Sawstop! Sizing the strip laminated mahogany legs for Corrin's desk. The first of about five machining processes on these parts before they're ready for final assembly.

Finally getting to the end of the fussy veneering and fitting of the desk carcase. I'm reluctant to glue anything together until I'm absolutely certain everything is copascetic. Vertical grain swietenia macrophylla and curly maple when laminated to 18mm Baltic birch yielded exactly .750, making the math a little easier.

So waddaya do when you need a constant radius template with a really really long radius? Make a really really long swing arm for the router!! This is exactly 22' 7-1/4". BTW, if you haven't tried one of these Dewalt 611 routers you don't know what you're missing. They're precise, lightweight, and quiet, and even though they only have a 1/4" collet they have plenty of power for most jobs. Great little tools and all the usual add-ons are available. I have two of both fixed and plunge base units and I only occasionally have to take out the big and bigger Porter Cable machines (690 & 7539).

This is MY definition of a two-bagger. Ain't Rodney got nuthin' on me!

SHOP MATH:
One big board + six hours labor = 12 small tapered boards + 2 bags wood dust

I wasn't happy with the previous version of the leg form for Corrin's desk, so I re-drew it with a 6" wider stance and included allowance for some springback. I made a new template from a spline curve generated in Fusion 360 and began the laborious process of building a new bending form. It contains nearly a full sheet of 3/4" MDF so it weighs at least 80 lbs. In this video I'm shaping the second half of the form on my beast of a shaper; the SCM T160 with power raise and tilt. 7" under the nut. The 100mm dia. cutter has 36 carbide inserts and a 4" rub collar.

Being warm as it was today it seemed like a good day to glue up the trial arch. If you're looking closely and saying, hey - that's not the form you showed us last time, you're right. The shaper ate that one when I tried to get too fussy with it. I didn't like it anyway; this new one is far more precise using MDF instead of construction grade plywood. I had thought the giant yellow ratchet strap would apply enough force to bring the six laminations into compliance, but I had to revise the form to use clamps as well. Those six plies taper from 3/16 in the center to 7/16 at the ends and they fought hard. I'm hoping the epoxy cures hard enough to keep everything in place and prevent any spring back. Gonna leave it on the form at least 48 hours.

Corrin's desk in the works. Bending fixture nearly completed and test tapered strips for the strip laminated parabolic arch. I'll use a 3" wide Truckers ratchet strap to apply the even pressure required.

Musings on a sit/stand desk....

Second air brushed coat of yellow burnish on the pyramids in advance of size and then gold leaf. Not quite baby's butt quality yet, but close!

The fixture to create 40 inlay slots per side of this collar for the 14 gauge German silver wire. And the completed proof... Fussy work - again.

Playing with some inlay patterns for the German silver on this Macassar ebony veneered "collar". I think this one is too loud...

Accurate fixturing and angle measurement is the biggest secret to success when fabricating pyramids. Working off of centerlines permits extremely precise repeat placement of the workpieces. The extremely useful and free miter/bevel calculator found at http://jansson.us/jcompound.html#pyramid is indispensable as well. 3mm Baltic birch plywood providers an ultra strong spline and fits snugly in the kerf from a 1/8" wide circular saw blade.

Channeling Jacques Ruhlmann today.

Pressed the old "poor man's CNC" into service today making a hyper-critical mortise in a large poplar blank. This is to be a prototype urn for a large Ruhlmannesque desk with a twist - it will be mechanized. With a long-throw dial indicator and a bucket of patience, it's possible to hold tolerances of just a couple thousandths with this JDS multi router. CAD drawings only take things so far, then the realities of the workshop take over. Best to get this stuff all figured out before I start cutting $80/bd ft lumber!

Hans Wagner, the prolific Danish designer made it look so damn easy - and he did it over and over and over..... Last day of the special exhibition in Auckland.

The boss says, "Build it!". Yikes!

I love the smell of teak in the morning! This is east Asian teak, not the central American plantation grown variety with a very low ring count that looks more like pressure treated pine from home depot.
#teakfurniture

It's a beautiful day in central Texas for vacuum bagging out of doors! It's been too cold to use our #ultracat urea formaldehyde glue, so today we're letting the sun help warm things up and induce a reaction. These are shop sawn teak veneers on doors to a barbeque cabinet. Check out that shop built vacuum rig from #joewoodworker, works great for smaller workpieces!

It's been really hard to address the blank page after having been so wrapped up in the construction of John Shaw's 18th century rectilinear masterpiece. So now for something completely different - a compound curved, show-wood and upholstered 21st century luxe sofa. It takes real discipline to generate many concepts before locking into one for Autocad detailing. I'm sure there will be scale models involved as well - that is, if it goes anywhere other than the circular file....

Back to reality. Plumbing 102 as I begin to attack the long list of repair items my lovely wife allowed me to neglect in my headlong rush to the finish line for the Kerrville show. Yuuuuck!

In my freshman year a prof told our class it takes two people to create a work of art. First obviously is the artist, and then someone to shoot him before he ruins it. Fortunately for me, this time it was a deadline, and the Hepplewhite side board is finally resting comfortably at the Texas furniture maker's show in Kerrville! Come on out and see this fabulous group of pieces October 31 thru December 13 at the Kerrville art and cultural center. Open Tuesday thru Saturday every week and no admission fee!

Details, details....

Final assembly for the Hepplewhite Sideboard. Nerve wracking, fussy work fitting strikes and stops while not marring anything as the carcase is all pre-finished.

So here's the fixture, with its removable insert to cut the deep mortise for the lock body. And there's the Litto fit. Those devilish little escutcheons will be inserted another day, there's five doors to do, and it's delicate, tedious work best done when one can focus on that alone.

If there's anything more never wracking than cutting precision lock and hardware mortises in fully finished work I'm sure I don't know what it is. Attention don't wander, and fixtures don't fail me now...

This magnificent small chest of drawers was for me the highlight of the beleaguered "Museo de Artes Decorativos" in Madrid. Chock-a-Block with volunteer "docents" who knew almost nothing about the work. There's not even a descriptive tag to indicate it's date or provenance, sadly. I can speculate that the top is walnut, and the black bits are ebony, but the beautiful red burl of the columns and drawer fronts I haven't a clue. Any ideas out there?

Final tune up of joinery and then on to fitting hardware and the long finishing process. Ball and Ball just treated me to a whopping 33% price increase. $250 worth of little brass hinges and locks for this piece.

There's that darned cedar fixture again, this time doing half blind dovetails for a couple of drawers. I nibble very close to the scribe with my fabulous Dewalt 611 router, then use my double angle guide clamped to the main fixture to get nicely squared cheeks at exactly 10° right on the scribe lines, remove the fixtures and clean up the acute corners with a dovetail chisel and sharp knife. This joint fit snugly first time without any further adjustment necessary. I don't even have to relieve the hidden corners on the tails.

Chinese jigsaw puzzle

#Asachristiana and I went several rounds on this topic a couple months back, and we disagreed, but this is still the best, most accurate way to cut dovetail sockets in the leg tops for the rails on a table carcase. I made this fixture years ago (think it came from #FineWoodworking in the first place) and have used it dozens of times.
All work is done after scribing the dovetails' location on the legs. Initial calculations are necessary to determine where the back wall of the socket needs to be (1/2" here), and a straight stop cut to fit (it's the piece of 1/4" ply in the photo). A 1/4" upspiral bit in the router will hog out the socket to full depth in one pass, easily slicing the end grain to 15/16" depth in this case. Now there are two precise reference faces at right angles, the back and the bottom. Carefully nibble almost to the angled scribes, staying about 1/64" away.
A piece of nicely squared 6/4 scrap with one end cut to the dovetail angle (14° here) and clamped to the fixture precisely at the angled scribe makes a dead accurate guide for the sharp chisel to follow, creating the flat cheeks which are so important on this joint because they are the only true glue surfaces (long grain). Remove the fixture and clean up the inside corners. The joint usually fits nice and snug first time, with no further adjustment necessary! If minor paring is required, it's easy because all four faces of the socket will be flat and true. Now isn't that truly a beautiful thing?

Now you see it..... Now you don't. Swietenia is much easier to hide fake-o blend-o patches in because the grain is so busy. Very much like marquetry, a patch with tapered sides is used as its own pattern, scribed, and carefully excavated to the line with a small router. The patch is then glued and forced into the recess with heavy clamping pressure. It's important to have an offcut from the same piece so the color and grain pattern will match. As I'm building a piece, I save everything that falls off the workpieces as I cut and mill to final dimensions, often labeling the drops so I'll know which piece to use when I need to fix something I inevitably screw up! My dad used to say that a true craftsman is someone who can repair anything he botches.

Finally getting to see what this carcase will look like. Precisely fitting the numerous parts, dados, mortise and tenons (NOT to mention stringing) continues to be a real challenge on this relatively large piece. Four more panels, then the upper rails with their respective dovetails, and then I can start on the drawers.

Brackets ready for final shaping.

More wooden jewelry. Federal period fans of holly and ebony today. Siesta key Florida sand for the sand shading; it's the finest I know of. I do these a little differently than the books say to. No blue tape, all joints glued together and assemblies carefully sanded to .024" thickness. These will be dropped into routed recesses in their parent pieces along with two strips of heat bent stringing to complete the assembly. Pieces shown have a radius of 1.81".

Welcome to MY world. Just another fun Sunday making order out of chaos in my fab studio....

POP! QC mahogany, mahogany crotch, zebrawood, holly and ebony. All in just the right amounts, and in just the right places. I'm learning to have a LOT more respect for those old timers.... I don't want to think about the amount of time I have in just this one door, and it still has to be mortised for hinges and fitted for a lock and then finished.

The wood Gods are smiling today. Now if I can just keep that nasty old sander at bay...

#craigthibodeau is absolutely right when he says in his new book (paraphrasing here), "There's nothing more soul sucking than sanding through the veneer you've just worked so hard to lay up..." The only good thing to come out of this painful lesson is that it forced me figure out how to use the "veneer saver" package on the Timesaver....

Elliptical crossbanding completed with zebrawood and east Indian satinwood. Now on to the inlay banding to make these ellipses really pop.

A large piece in the bag. Veneering both sides of this simultaneously, with time to spare in spite of the 90° temperature, thanks to #ultracat urea formaldehyde glue.

Today we're sizing the 1/16" thick ebony and holly inlay band billet before cross cutting it into 1/8" wide chips for final assembly. Also, a photo of the card scraper rig that allows such precise thicknessing. I'd like to take credit for this clever device, but that goes to @michaelfortune (see FW #232). I did improve on his design however, by adding a stainless steel plate in the rig's throat. This prevents shavings from sticking in the throat and thus improves accuracy. I can work to a tolerance of half a thousandth down to 1/32", which is the thickness of the holly strips.

Book matched mahogany crotch veneers with quarter sawn mahogany cross-banding. These panels will receive inlay banding once they come out of the vacuum press.

If I've got to make 64 of anything, you better believe I'm gonna fixture it, even if the jig costs me a couple hours to make. Here's the little whiz-bang with a De-Sta-Co push toggle for making all those tiny crescents in this 1/16" holly stringing. I shoulda been a jeweler...

More fussy work today - 1/16" holly stringing. It's quite amazing how compliant the holly is, when curled slowly around a 5/8" diameter heated mandrel the lignins loosen up enough to allow the strip to bend like plastic. Over time the curl relaxes to 3/4" ID, which is exactly the dimension I need.

Making more miniature doll house parts today. The tiny squares in this inlay band are 1/16" holly and ebony. Can I go and mill some rough lumber now, please?

This is a sawtooth inlay band, just 5/8" wide, of gaboon ebony and show white English holly. The borders are 1/16" square, and I mean .062", not plus-or minus. The precision required to pull this off is incredible, and gives me even more respect for those 18th century craftsman who didn't have the luxuries in their shops that I do in mine. All the pieces started as solid sawn lumber from which I've made veneers. I have built no less than six fixtures for this inlay alone, the final one being the assembly jig which is no more than a precise dado to hold everything in place while the glue dries. I'm using a model maker's 52 TPI backsaw with a .008" kerf to cut the tiny triangles. I need 38" of this band: that's about 260 triangles. Better get back to work!

These days I'm used to buying $200 boards at the lumberyard, but I usually get more than a couple of board feet for my money. From front to back; east Indian satinwood, gaboon ebony, holly, and box wood sheets. Over $300. These will be resaw into precious sheets of veneer for decorative inlays on an eighteenth century reproduction.

A challenging resaw task today, 16" mahogany boards being used for a heavy veneer on Baltic birch cores. I sandwich the mahogany between two panels, vacuum bag the assembly, then peel off an 1/8" with each panel. Reverse; repeat.

"The beauty one can find in art is one of the pitifully few real and lasting products of human endeavor." J. Paul Getty
This is a sixteenth century cabinet in the Getty museum outside LA. The colored bits (and there's lots of them) are lapis, agate, and other hard stones inlaid on oak. A really remarkable piece of work, it's about 48" wide and over 7' tall with the base.

So I'll consider this a qualified success, the only minor disappointment being a larger deviation in thickness than desired - that being .005" instead of .003. I attribute that to the vacuum fixture being slightly put of plane. Due to random leakage, It took both of my vacuum pumps working in tandem to manage a draw of 8 inches of mercury which held the veneers tightly to the fixture. The process starts with resawing 1/32" slices at the bandsaw...

Trying something on the edge of the envelope today. I've been unable to hold tolerances to my standards on thin stock. And anything less than an eighth - fuggedaboudit. Here is a vacuum hold down fixture to run through the wide belt sander - with vacuum line attached! There are 260 #60 holes drilled in the platten. I'm hoping to be able to hold thickness tolerance to a few thousandths, all the way down to standard veneer thickness - 1/42 of an inch (.028). Gonna seal up the box and try it out later today. Stay tuned for the results, good or crushing!

Five hours to design and build that fixture. Sometimes woodworking is like courting. Hours and hours of preparation for a few minutes of sheer bliss. Oh - and 20 minutes to clean up the mess. That shaper throws a lot of chip.

Some things just have to have a road map. I make enough mistakes even with one! Now on to the hard part, making wood chips..

All boxed up and ready to go! These were more work than I bargained for, as usual.

Day four. I think I'm winning. Stacked up they look almost like architecture.... #oilstonebox #wood #furniture #custom #design #one of a kind #Austin #Leolitto #leolittofurniture #Austin

Sub assemblies completed. Now on to profiling, more sanding, and final fitting. This is about half of the production run. If not for some interesting woods and grain this would be a complete crushing bore! #leolitto #woodworking #custom furniture #custom design #mesquite #designed for you #heirloom furniture #one-of-a-kind #wood furniture #escarpment cherry #pecan # Texas #Austin

A hundred Chinese puzzle boxes made of tiny "doll-house furniture" parts. These are exactly 1.400" long. In order for the lids to fit snugly, tolerances must be held to just a couple of thousandth over the entire run. Ten interlocking parts per box....

It's photography day at the studio. Roll out the seamless and let the party begin!

The right tool for the job. That 16", 5/32" kerf blade sounds like a turbo prop!

Ten hours to build a fixture, 12 minutes to skive the seat....

This is a red letter day in my studio as the last of the 16 exotic veneer tray tables leaves the finishing room bound for charity auction at the Austin zoo grand gala. More than 18 months since being awarded Best of Show at the TX furniture maker's show, I will no longer have to move the last three carcasses back and forth from the wide belt sander to the radial saw table, a major improvement in shop function! If the included article is too small to read, that's Wendell Castle in the RIT alumni magazine, one of my woodworking heroes from those early days in Rochester. He NEVER built more than one of ANYTHING, and I wish I had his amazing vision so that I could do the same...

It's been said, "If the only tool you have is a hammer, everything tends to look like a nail". So if the only machine you have is a lathe, then all your output... This early 17th century chair is from the collection at the South Australia Art Gallery in Adelaide. Gidday, mates!

Never underestimate the sunk time or cost of installing a new piece of equipment. I finally, begrudgingly undertook the installation of full-blown shop air (forgive me) after having the behemoth compressor taking up space in the shop for many months. 3/4" Galvanized pipe and fittings to supply 3 drops; regulators; valves; hose reels; air dryer; conduit; wire and electrical supplies; a half dozen trips to suppliers. With my "free" labor, the cost of parts alone equaled that of the industrial quality two stage piston compressor unit. But now, ohhhh the benefits! Shown here, my OSHA red tag special work platform on trusty Quasimodo's forks to reach the lofty ceiling....

It ain't all furniture out there, folks. Stairs come pretty close though. Here I'm replacing a carpeted stair with natural birch treads and risers. This handy gauge of Baltic birch allows me to perfectly capture all the angles and scribe them directly on my treads before cutting on the sliding miter saw. It includes a provision for the nosing at exactly 1-3/16". Nothing is square, and precious little is straight, although this SYP carriage is cut better than most. Happy holidays to all!

Sometimes a "custom" woodworker is forced into production work due to economic realities. These exercises require a different mindset, which forces one to design and produce utilizing power equipment and fixturing to the greatest extent possible. Hand processes, and handling individual pieces multiple times add time and thus cost. This photo shows a recently completed run of 60 business card holders made primarily with the 8/4 "drops" from furniture pieces long gone from the shop. Lumber that would otherwise go to waste. These little desk emblems were a big hit with customers at the gallery shop in Kerrville last year, and make terrific special gifts. In figured African Sipo, genuine Mahogany, and curly Maple with cherry, birdseye, and walnut accents, they are a bargain at $18. Available on Etsy and in select gift shops.

Today I'm making a cane for an old family friend who requested something sort of fashionable that she'd enjoy using now that she's been consigned to using one every day. Texas mesquite with a hard maple handle sized and sculpted to comfortably fit her small hands.

It's showtime! Finally complete the day before delivery. This will be the first time I enter a historic reproduction piece in the TX furniture maker's show. This 18th century "southern huntboard" is from a drawing done by Carlyle Lynch of a piece in a private collection. Constructed mostly of genuine mahogany, the top is one solid piece. The remarkable chatoyance of the pomele sapele veneer is enhanced by 14 coats of high gloss urethane varnish hand rubbed and cut back every three coats, and top coated with a lower sheen varnish.

Wide boards move across their grain with seasonal changes in the atmosphere. It's not uncommon for a 12" wide board to gain or lose a total of 5/32", so proper furniture design must allow for this movement. As the individual cells in the wood take on or give off moisture, they inexorably expand and contract, generating forces that will not be denied. Significant failures (splits or cracks) in older pieces can be attributed to faulty design regarding wood movement.
This photo shows a well designed joint with two large flat tenons in a cross-grain situation. Only the upper tenon will be glued: 4" is generally considered to be the upper limit for safely securing a cross-grain joint. The lower tenon is held in place by a tightly fitting, square, and very hard peg, whose elongated square mortise allows the wide board to expand and contract. This is very fussy and tight tolerance work....

"The world doesn't need another chair". Craig McArt, c.1979
These words delivered by my industrial design professor were ringing in my ears as I toured the Danish Design Museum in Copenhagen yesterday. Hundreds of examples from prolific designers like Finn Juhl and Hans Wegner (his peacock chair pictured here) drove the point home unequivocally.

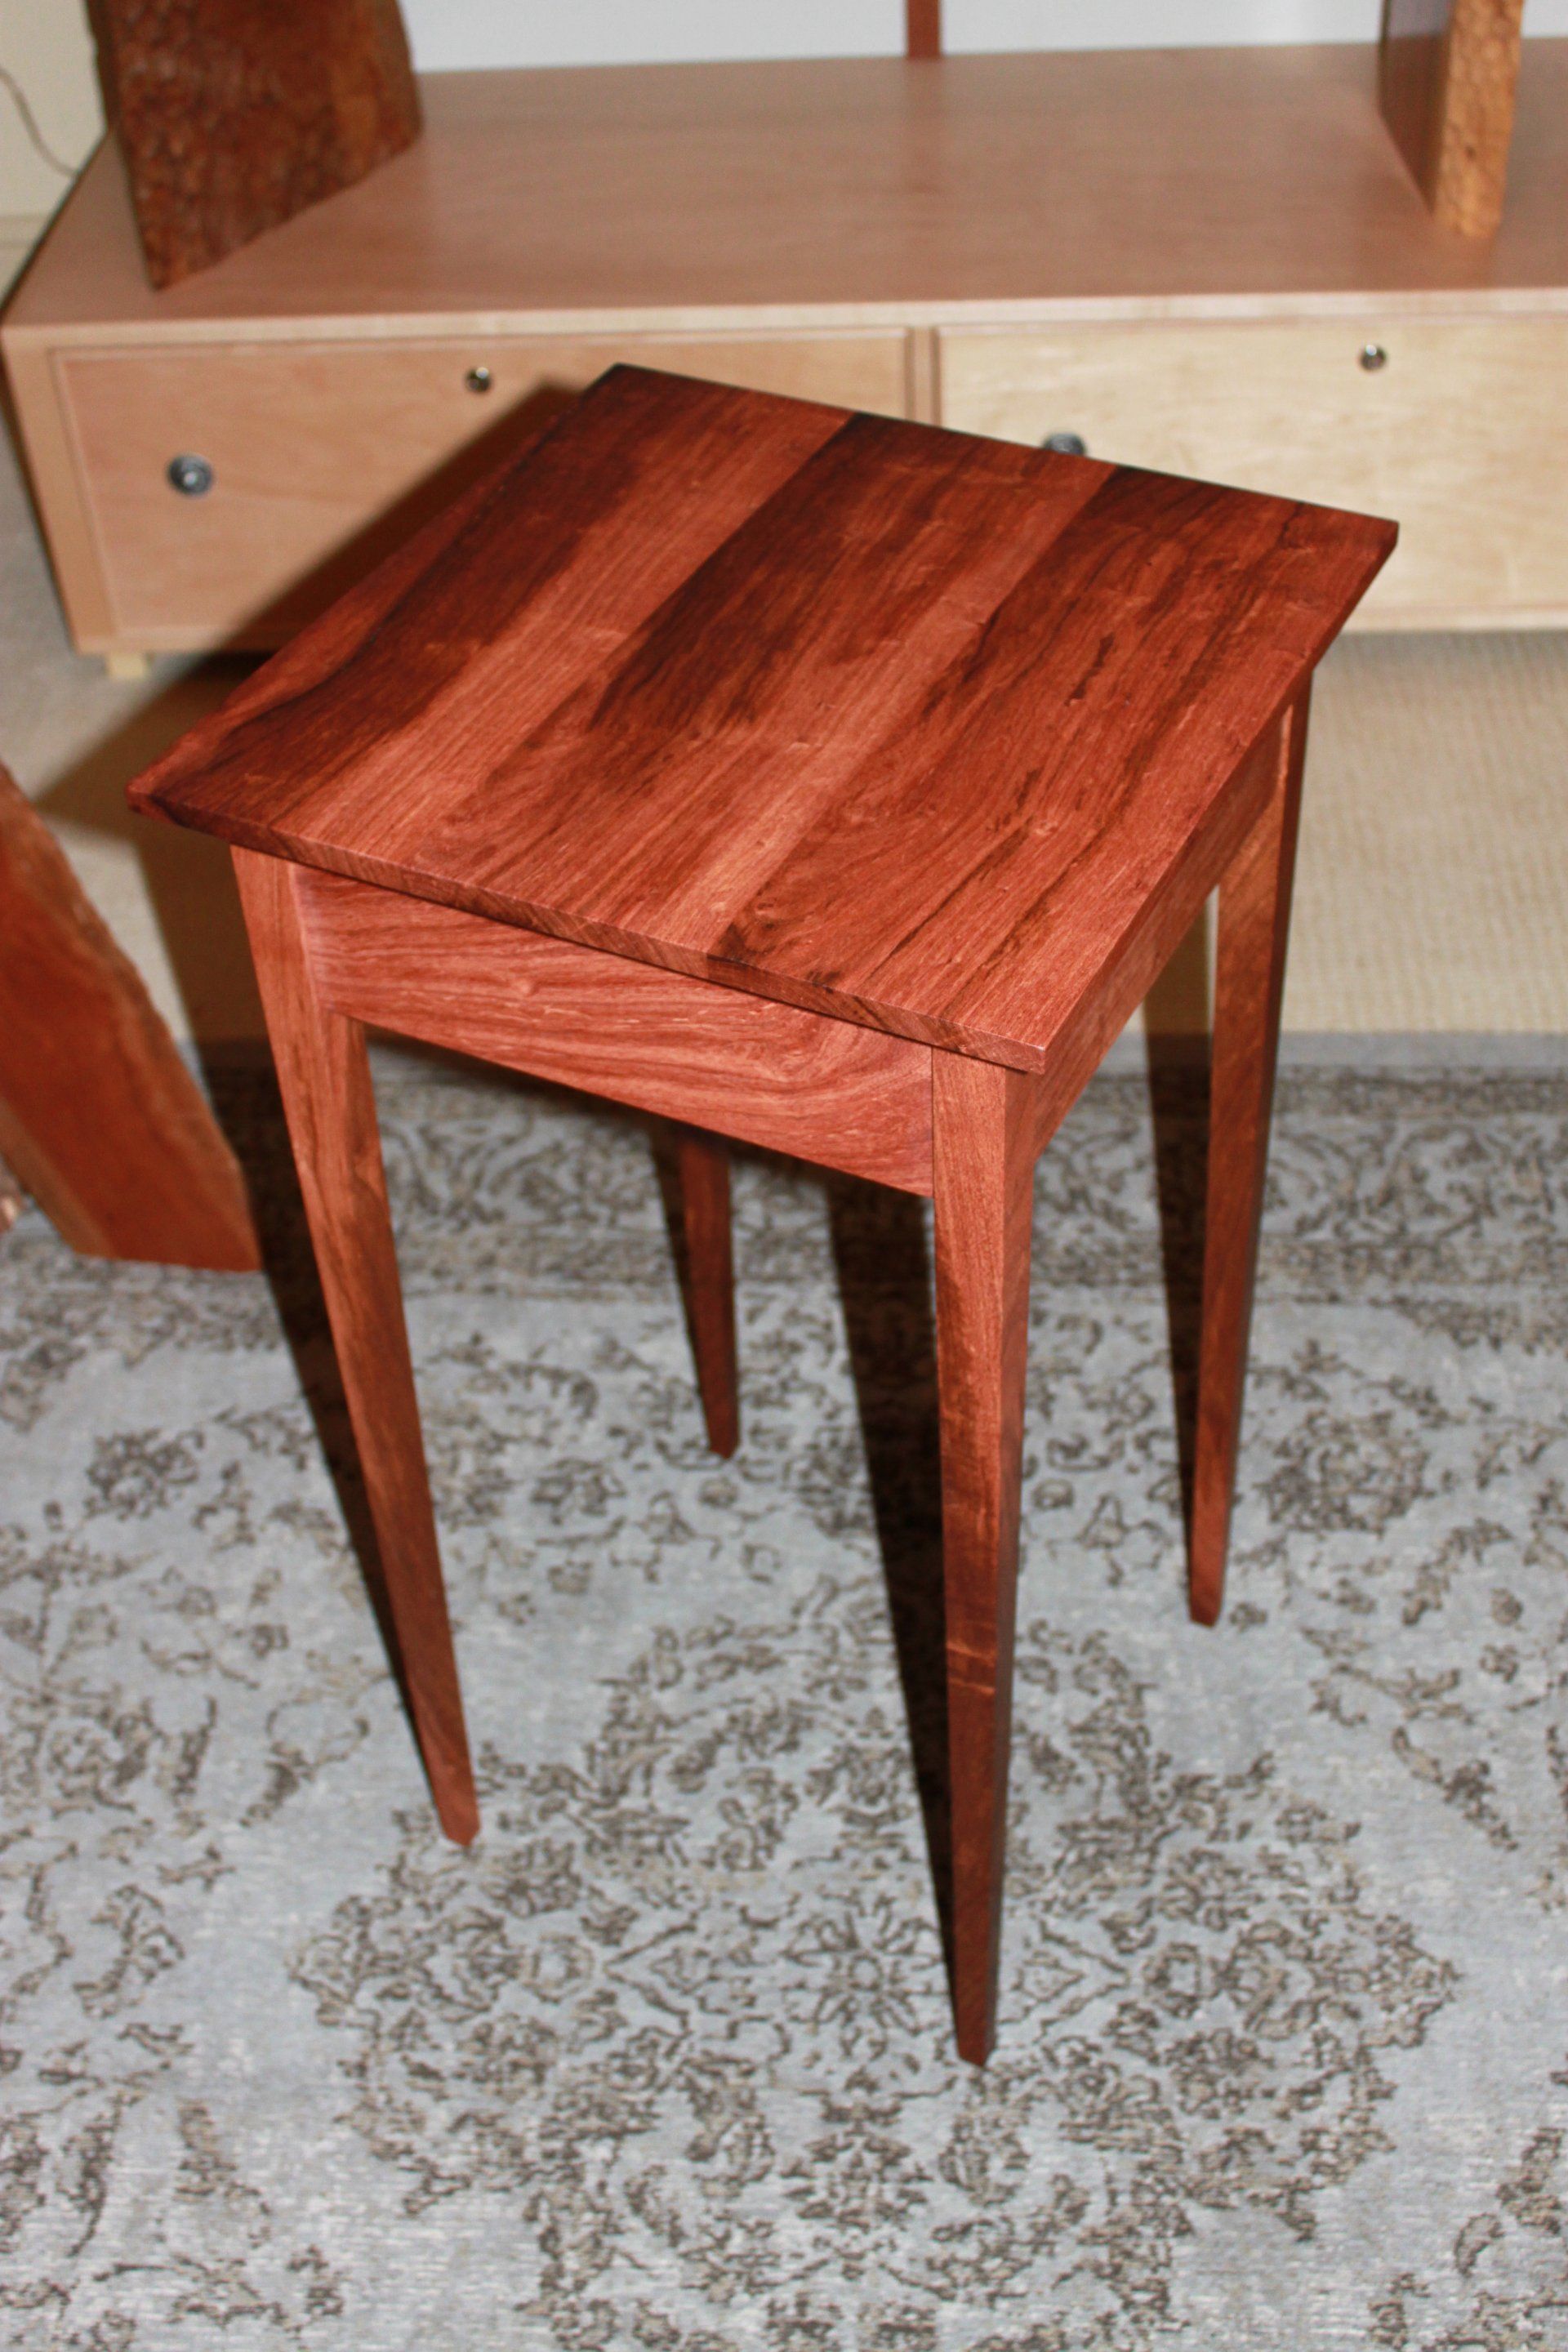
This is one end of one of my Nakashima style benches made from escarpment cherry, a local variant of prunus serotina upon which I have waxed rhapsodic in a previous post. The inset piece is Swiss pear. I noticed the morning sun caught the piece, which sits in our living room, and displayed the marvelous colors and textures of the materials, joinery and tooling to perfection. Is that not a beautiful display of nature's glory?

This is a coffee table top of escarpment cherry. It is a true cherry, prunus serotina, genetically the same as northern cherry from Pennsylvania or New York. This variant grows only in the calcerous soils of the Edwards plateau in central Texas; that's just five counties. It's relatively rare and it could almost be called an iron wood. The growing conditions render the heartwood twice as dense and much harder than its northern relative. This slab as shown has six coats of crystal polyurethane, and will get six more plus a low sheen top coat before it's done.

Today I'm making wood jewelry! Well not really, but these high precision parts for somebody's coffee table have me working under 5 power magnification so I can see what I'm doing. The tusk tenons are made of wenge, a nasty splintery (but pretty) wood, and the dowel pins are Swiss pear, very stable and tight grained.

Back to cutting pins, this time on half blind mitered dovetails, a devilishly difficult joint favored by George Nakashima. The beauty of this joint is that it permits the grain pattern to flow uninterrupted up, across, and down the other side of the carcase. This part will be the top of a four-drawer file bovie. The single board of quarter sawn ribbon sapele shown is over 15" wide, and every growth ring is perpendicular to the face. Imagine the size of the tree this must have come from....

Where have I been. Since my last post my father died. He was a great inspiration to me. Every day while I work in my studio I use many of the tools he used daily to create his often magnificent works of art. Some of these tools were my grandfather's, himself a talented violin maker. It's hard not to think about these great craftsmen and their lives as my heritage flows through them to their cutting edge. I wonder in whose hands these tools will next find themselves, as the many generations of Litto craftsmen end with me.
Here is one of several detail photos I am considering for this nautical themed tray table, which will be entered in the 2017 VeneerTech craftsman's challenge. The grand prize for this international show carries with it not only a handsome cash award, but prestigious recognition and publicity. This is the same piece that placed in last year's Design in Wood show in San Diego, and won first place at the Woodworker's Source "Platters, Trays, and Trivets" show in Phoenix, where it was badly damaged. You'd never know it now after a trip back through "Gepetto's" workshop.
When I was a boy, my grandfather told a great story about a concert master who was bringing a violin in to papa's shop for a tune up, and dropped it as he crossed the snowy street. A car hit it, but the dismayed player brought the crushed case in anyway to see if anything could be done to save it. After surveying the splintered mess, Grandpa told him to come back in two weeks, which he did, and upon trying out the repaired instrument exclaimed "it never sounded better"! So ontogeny recapitulates phylogeny after all, and I am eternally grateful to all those who lived before me, and contributed to the joy (and sometimes frustration) that I am fortunate to enjoy every day in my work!

This is a sewing machine table I just completed for my lovely wife, Debbie for our 24th anniversary. It is a companion piece for a 7-foot maple work table I built for her years ago. This one is more petite and feminine, using curly and birdseye maple with Swiss pear wood accents and drawer fronts. Note the repurposed bobbins for pulls! In a future post I'll explain the details of my unique pegged expansion joint that allows the use of mitered corners on the "picture frame" top.

Ultra-sharp chisels are key to producing accurate, tight fitting dovetails. In addition, they are a joy to use, literally whispering as they slice cleanly through end grain. To maintain their edges I must touch them up every few minutes of use. I use an 8000 grit water stone followed by a leather strop charged with polishing compound. The result is a mirror polish on the cutting edge. To call them sharp as razors really doesn't do them justice as they are sharper than that!

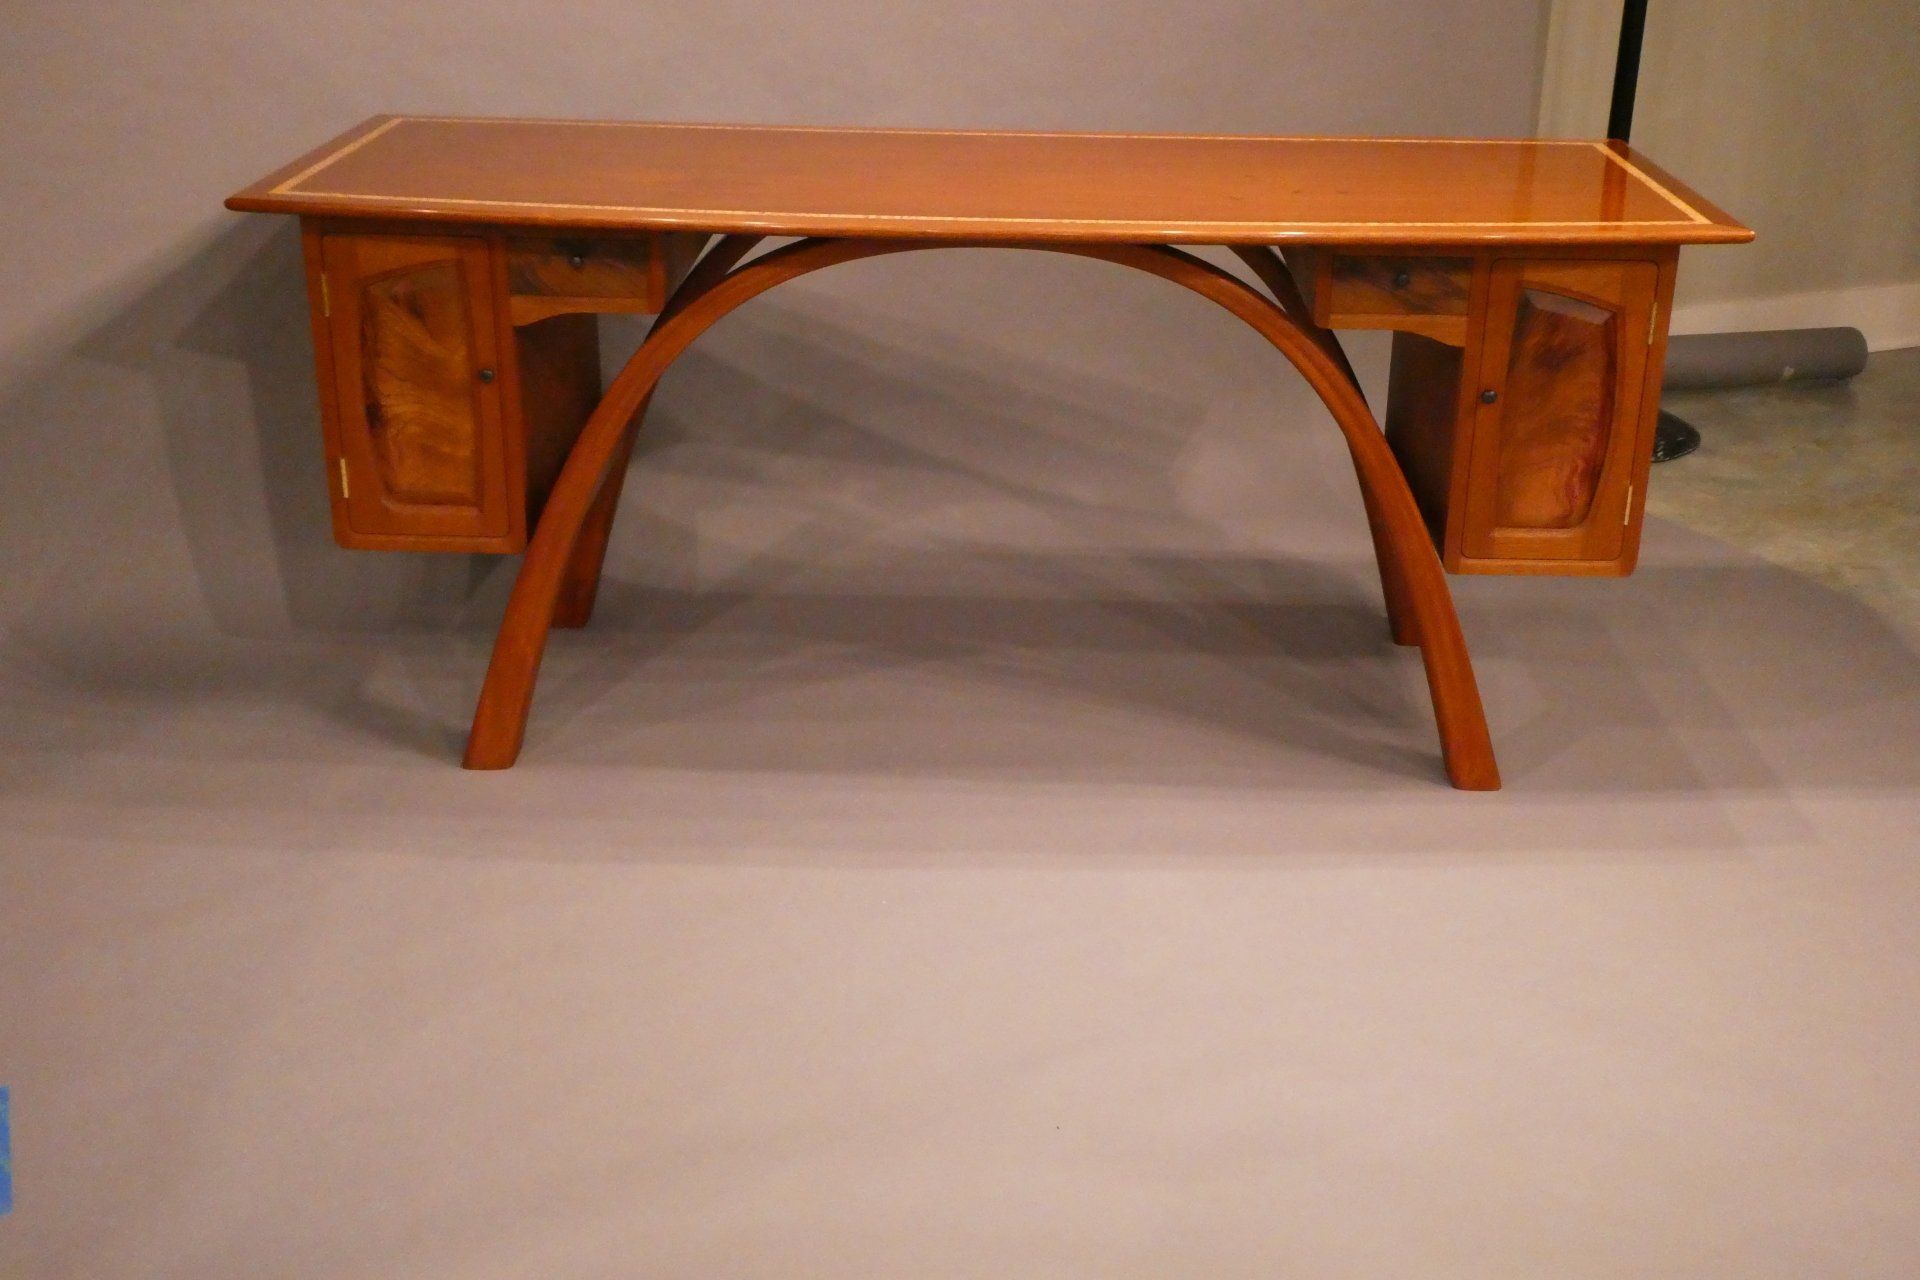
Executive computer design of walnut and sipo

The joint inspector

Beautifully figured sipo writing desk
View more